Building Email Forms Natively in Craft
This article was written for Craft 2 and has not been updated. The concepts and approach are valid, but some templating changes are required for Craft 3.
The folks behind Craft have a simple e‑mail plugin, Contact Form, that sends a form submission as an e‑mail. At its most basic level, you can add a static form to your template with fromEmail and message fields, wait for a user to stumble upon it and fill it out, then you receive a shiny new email in your inbox.
<form method="post" action="" accept-charset="UTF-8">
    {{ getCsrfInput() }}
    <input type="hidden" name="action" value="contactForm/sendMessage">

    <label for="fromEmail">Your Email</label>
    <input id="fromEmail" type="text" name="fromEmail" value="{% if message is defined %}{{ message.fromEmail }}{% endif %}">
    {{ message is defined and message ? errorList(message.getErrors('fromEmail')) }}

    <label for="message">Message</label>
    <textarea rows="10" cols="40" id="message" name="message">{% if message is defined %}{{ message.message }}{% endif %}</textarea>
    {{ message is defined and message ? errorList(message.getErrors('message')) }}

    <input type="submit" value="Send">
</form>
Add a Matrix to the mix, though, and you can build forms to your heart’s content.
Enter, the Matrix
Contact Form supports an array syntax for submitted message fields (i.e. name="message[name]", name="message[telephone]", etc.) which is used to create the body of the email it sends. With a "Fields" Matrix you can extend the email body to be quite robust. I usually start with the following block types:
- Checkbox
- File
- Hidden
- Instructions
- Radio
- Select
- Text
- Text area
Most block types include these fields:
- Label (Plain Text) — the label shown to visitors and the
nameparameter for the field - Required (Lightswitch) — whether or not the field is required
- Instructions (Plain Text) — helpful text shown to visitors
“Checkbox”, "Radio", and "Select" can include multiple values or fields, so those get an additional "Options" field:
- Options (Table) — the options available to the user
- Label (Single-line Text) — the label shown next to the field
- Value (Single-line Text) — the value submitted with the field
- Checked? (Checkbox) — whether the field should be selected by default
“Instructions” is an exception — it’s simply used to let editors add text between fields in the form:
- Text (Rich Text) — static text to add context or clarity
Form Entries
The "Fields" Matrix is added to a "Forms" channel. Regardless of whether I intend to have a direct URL to each form, I check the Entries in this section have their own URLs option so content editor’s can preview the form as it’s being built.
In addition to the "Fields" Matrix, I add:
- To Email (Plain Text) — the email where the form submission is sent
- Submit Label (Plain Text) — the label for the submit button (i.e. Send or Sign Up)
- Success Message (Rich Text) — the message to display when the form is submitted successfully
- Redirect (Matrix) — the entry, url, or asset the visitor should be redirected to after a successful submission
Making Contact Form dynamic
Replace the "Message" textarea in the code excerpt above with logic that loops through the "Field" Matrix and you’ve got yourself a simple form builder.
<form method="post" action="" accept-charset="UTF-8">
    {{ getCsrfInput() }}
    <input type="hidden" name="action" value="contactForm/sendMessage">

    <label for="fromEmail">Your Email</label>
    <input id="fromEmail" type="text" name="fromEmail" value="{% if message is defined %}{{ message.fromEmail }}{% endif %}">
    {{ message is defined and message ? errorList(message.getErrors('fromEmail')) }}

    {# Loop through the fields Matrix #}
    {%- for field in entry.fieldBlocks -%}
        {# Output markup for each field #}
    {%- endfor -%}

    <input type="submit" value="Send">
</form>
Text, File, and Hidden block types (if the field is hidden, don’t output the label or instructions):
{%- set label = field.label -%}
{# Use the Matrix block type to set the type of field (i.e. tel, text, etc.) #}
{%- set type = field.type ?? "text" -%}
{# Generate a random id so that clicking the field's label focusses the field #}
{%- set id = "f_" ~ random() -%}
<label for="{{ id }}">
    {{ label }}
</label>
{%- if field.instructions|length -%}
    {{ field.instructions }}
{%- endif -%}
<input
    value=""
    name="message[{{ label }}]"
    id="{{ id }}"
    type="{{ type }}"
    {% if field.required %}
        required
    {% endif %}
/>
“Checkbox” and "Radio" block type:
{%- set label = field.label -%}
{%- set type = field.type ?? "checkbox" -%}
<label>
    {{ label }}
</label>
{%- if field.instructions|length -%}
    {{ field.instructions }}
{%- endif -%}
{%- for option in field.options -%}
    {# Generate a random id so that clicking the field's label selects the field #}
    {%- set id = 'f_' ~ random()  -%}
    <input
        type="{{ type }}"
        {#
        # For checkboxes, make the name an array by adding []
        # so multiple checkboxes may be selected
        #}
        name="message[{{ label }}]{{- (type == "checkbox" ? "[]") -}}"
        id="{{ id }}"
        value="{{ option.value }}"
        {% if option.checked %}
        checked
        {% endif %}
        {% if field.required %}
            required
        {% endif %}
    />
    <label for="{{ id }}">
        {{ option.label }}
    </label>
{%- endfor -%}
“Instructions” block type:
{%- if field.text|length -%}
    {{ field.text }}
{%- endif -%}
“Select” block type:
{%- set label = field["label"] %}
<label>
    {{ label }}
</label>
<select
    name="message[{{ field["label"] }}]"
>
    {%- for option in field.options -%}
        {%- set value = option[optionValueKey] ?? "" %}
        {%- set label = option["label"] ?? "" -%}
        <option
            value="{{ value }}"
            {% if option["selected"] %}
                selected
            {% endif %}
        >
            {{ label }}
        </option>
    {%- endfor -%}
</select>
“Text area” block type:
{%- set label = field.label -%}
{# Generate a random id so that clicking the field's label focusses the field #}
{%- set id = "f_" ~ random() -%}
<label for="{{ id }}">
    {{ label }}
</label>
{%- if field.instructions|length -%}
    {{ field.instructions }}
{%- endif -%}
<textarea
    id="{{ id }}"
    name="message[{{ label }}]"
    {% if field.required %}
     required
    {% endif %}
>
</textarea>
Form Builder comes standard
Content editors can use Craft’s "Live Preview" to see the form as it will appear on the site’s front-end as they add "Field" blocks and drag and drop the blocks to arrange them.
Manage the form’s recipient on a form by form basis
You can set the form’s recipient for each form on your site by adding a "To Email" field to your "Form" channel entries. Output that field’s value as a hidden field in your template. The value of the field should be hashed using Craft’s hash Twig filter. The posted value is then validated server side to help prevent spam and abuse.
<form method="post" action="" accept-charset="UTF-8">
    ...
    {# The form submission will be sent to the `toEmail` if set, otherwise it will be sent to the email set in the Contact Form settings #}
    {%- if entry.toEmail|length -%}
        <input type="hidden" name="toEmail" value="{{entry. toEmail|hash }}" />
    {%- endif -%}
    ...
</form>
Then, in the Contact Form config file (craft/config/contactform.php), you’ll need to add the following logic so the plugin will use the posted value if it exists and hasn’t been tampered with.
<?php
    namespace Craft;

    $toEmail = craft()->request->getPost('toEmail');
    $toEmail = craft()->security->validateData($toEmail);

    return array(
        'toEmail' => ($toEmail ?: null),
         ...
     );
Handling "Success Messages" and redirects
Contact Form supports redirecting users to a posted redirect URL when a form is successfully submitted. Add a "Redirect" field to your entry to let content managers decide where visitors should be redirected after submitting a form.
Contact Form also sets a flash notice that you can display in your template after a form is successfully submitted.
{% if craft.session.hasFlash('notice') %}
    <div class="alert alert--flash">
        {{ craft.session.getFlash('notice') }}
    </div>
{% endif %}
If you add a "Success Message" field to your "Form" entries, content managers can set this message for each form. To override Contact Form’s default success message, check for a posted successMessage variable in the Contact Form config file.
<form method="post" action="" accept-charset="UTF-8">
    ...
    {# Override the flash message on a form by form basis by setting `successFlashMessage` in `craft/config/contactform.php` to this post variable #}
    {%- if entry.successMessage|length -%}
        <input type="hidden" name="notice" value="{{ entry.successMessage|hash }}" />
    {%- endif -%}
    ...
</form>
craft/config/contactform.php:
<?php
    namespace Craft;

    $successFlashMessage = craft()->request->getPost('notice');
    $successFlashMessage = craft()->security->validateData($successFlashMessage);

    return array(
        'successFlashMessage' => ($successFlashMessage ?: null),
         ...
     );
Handling errors
When a submission doesn’t validate, the template will be reloaded. The message model has a getErrors method you can use to show the error message for any fields that failed validation.
{%- for field in entry.fieldBlocks -%}
    {%- set label = field.label -%}
    <label>
        {{ label }}
    </label>
    <input
        value=""
        name="message[{{ label }}]"
        ...
     />
    {# If `message` exists it has been returned from the plugin, pass in each field's `message` key to see if the field failed to validate #}
    {%- if message is defined %}
        {% for error in message.getErrors(label) %}
            <div class="error">{{ error }}</div>
        {% endfor %}
    {%- endif -%}
{%- endfor -%}
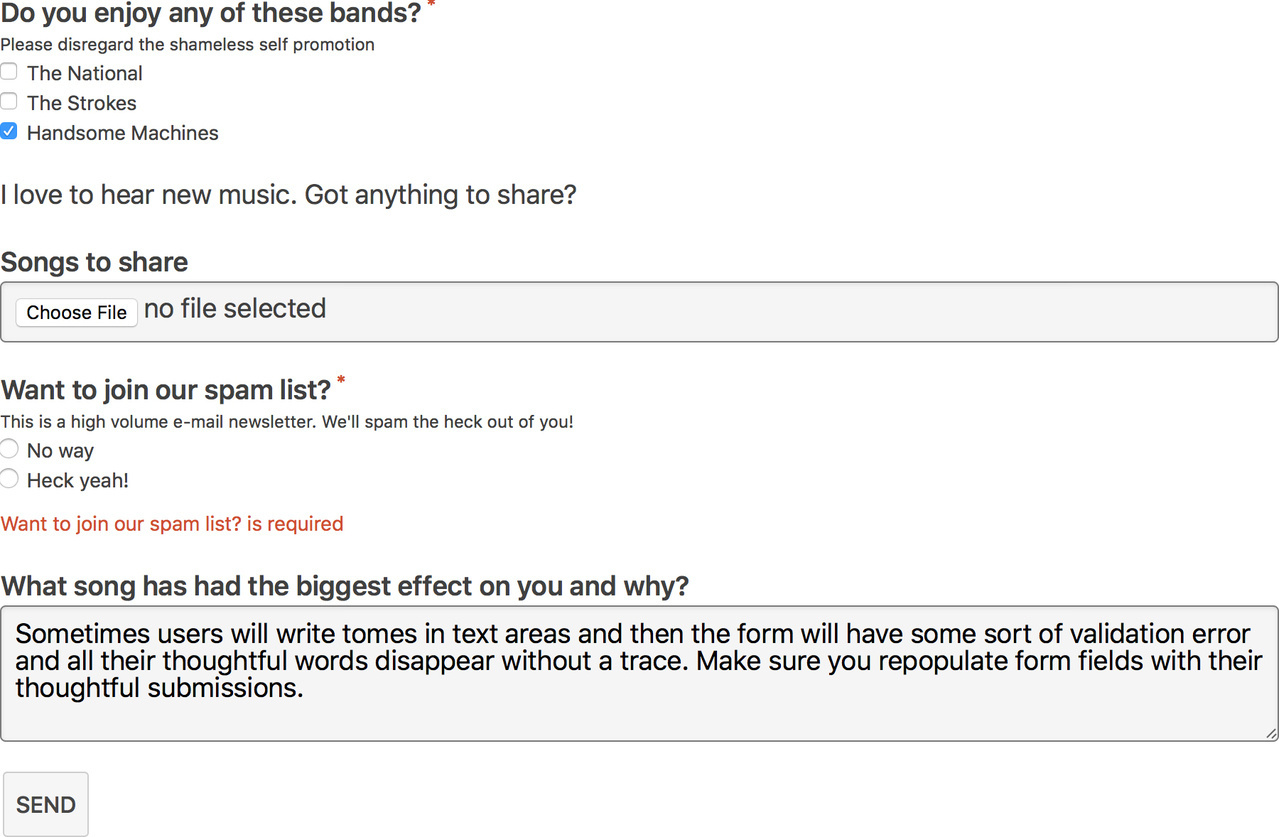
In addition to showing visitors validation errors so they can fix them, you should repopulate their submitted values in each field so they aren’t driven insane. You can repopulate custom message field’s using the message.messageFields method.
{%- for field in entry.fieldBlocks -%}
    {%- set label = field.label -%}
    {# Set the field's value to the user's submitted value if the form has failed validation #}
    {%- set value = message is defined and message ? message.messageFields[label] : "" -%}
    <label>
        {{ label }}
    </label>
    <input
        value="{{ value }}"
        name="message[{{ label }}]"
        ...
     />
    {# If `message` exists pass in each field's `message` key to see if the field failed to validate #}
    {%- if message is defined and message -%}
        {% for error in message.getErrors(label) %}
            <div class="error">{{ error }}</div>
        {% endfor %}
    {%- endif -%}
{%- endfor -%}
Contact Form only requires fromEmail and message values for a form to pass validation, but in the "Fields" Matrix, content editors can set whether each field should be required. Contact Form won’t validate these fields, so depending on how required they really are, you can prevent the form from being submitted using a JavaScript plugin like the jQuery Validation plugin, or, if the fields are really required, hook into Contact Form’s onBeforeSendevent in a plugin and make sure the fields marked required on the "Form" entry were submitted (here’s an example).
Extending Contact Form in other ways
Adding additional block types to the "Fields" Matrix and logic to your templates can allow for more flexible and robust options for content editors. Contact Form’s onBeforeSend event can be used for much more than validation, such as creating an entry in a "Form Submissions" channel before the submission is sent as an email.
Do you do something similar? Have suggestions? Please send along any corrections or improvements via email or Twitter.
All Posts